
In this article, we gonna explore some essential tips for maintaining your bike chain. Trust me, if you want your bike to last, you gotta pay attention to this stuff. But like, what even is a bike chain? It’s that metal thingy that connects your pedals to your wheels. Not really sure why this matters, but it totally does!
Understanding Your Bike Chain
- It’s the unsung hero of your bike, you know?
- Without it, you’re basically riding a fancy piece of art.
Importance of Regular Maintenance
You might think, “Why should I bother?” Well, regular maintenance keeps your bike running smooth and helps avoid costly repairs later. Plus, who doesn’t want a shiny chain? Seriously, it’s like the bling of your bike!
Signs Your Chain Needs Attention
- If it’s making weird noises or skipping gears, it’s probably time to take a closer look.
- A noisy chain is like a crying baby — it means something’s wrong! If you hear grinding or clicking, don’t ignore it. Fix it before it gets worse!
Noise Level Indicators
Sometimes it’s hard to tell when your chain is in trouble. If your bike is skipping gears, it’s not just being dramatic. It’s a sign that your chain could be stretched or worn out. Yikes, right?
| Noise Type | Possible Issue |
|---|---|
| Grinding | Chain is dirty or worn |
| Clicking | Chain misalignment or wear |
Tools You’ll Need
You don’t need a full toolbox, but having a few essential tools can make life easier. A chain cleaner, lubricant, and a basic repair kit should do the trick. Seriously, it’s like having a first aid kit for your bike!
Cleaning Your Bike Chain
Cleaning your chain is super important, but it can be a messy job. Don’t wear your favorite shirt, trust me on this one. First off, you’ll wanna remove the chain from your bike. It sounds scary, but it’s not that hard. Just follow these steps, and you’ll be golden!
Step-by-Step Cleaning Process
1. Remove the chain from your bike.2. Use a chain cleaner with degreaser.3. Rinse and dry it well.
Using a Chain Cleaner
A chain cleaner can save you time and effort. Just attach it, add some degreaser, and let it do its magic. It’s like a spa day for your chain! But don’t forget to rinse it off afterwards, or you’ll just be trading one mess for another.
Lubricating Your Chain
After cleaning, lubrication is key! A well-lubed chain runs smoother and lasts longer. But, don’t go overboard — too much lube is just as bad! Not all lubricants are created equal, so choose wisely.
Checking Chain Wear
Over time, chains stretch and wear out. You gotta check for that wear regularly. It’s like checking your bank account after a shopping spree — not always pretty! You can use a chain checker tool or even a ruler if you’re feeling adventurous.
When to Replace Your Chain
If your chain is too stretched or worn, it’s time to replace it. Don’t wait until it snaps on a ride — that’s just asking for trouble! So, get out there and keep pedaling!
Conclusion: Keep Riding Smooth
In conclusion, taking care of your bike chain is crucial for a smooth ride. It’s not rocket science, but it does require some attention. So, get out there and keep pedaling!
Understanding Your Bike Chain
So, what even is a bike chain? It’s that metal thingy that connects your pedals to your wheels. Not really sure why this matters, but it totally does! Like, if you think about it, without the chain, you’re just pedaling in place, right? Imagine trying to ride a bike with no chain—it’s like trying to cook without a stove. Just doesn’t work!
Now, let’s break it down a bit. A bike chain is made up of links that are all connected together. These links work in harmony to transfer the pedaling power from your legs to the wheels. You know, it’s like a team effort, but instead of people, it’s just a bunch of metal pieces. Crazy, right? But, here’s the kicker: if your bike chain is dirty or worn out, it can really mess with your ride. And trust me, nobody wants that!
Why Should You Care?
You might be thinking, “Why should I bother?” Well, regular maintenance keeps your bike running smooth and helps avoid costly repairs later. Plus, who doesn’t want a shiny chain? It’s like having a clean car; it just feels good. Plus, a clean bike chain can actually improve your bike’s performance. It’s like putting on a fresh pair of sneakers before a run. You feel faster, right?
- Improved Efficiency: A clean chain means less friction, which translates to better speed.
- Longer Lifespan: A well-maintained chain lasts longer, saving you money in the long run.
- Better Riding Experience: Smooth rides are just more fun. Who wants to deal with a squeaky chain?
Signs Your Chain Needs Attention
Sometimes it’s hard to tell when your chain is in trouble. If it’s making weird noises or skipping gears, it’s probably time to take a closer look. A noisy chain is like a crying baby — it means something’s wrong! If you hear grinding or clicking, don’t ignore it. Seriously, fix it before it gets worse!
Here’s a quick list of common signs that your chain might need some love:
- Noise: Grinding or clicking sounds.
- Skipping Gears: If your bike is skipping gears, it’s not just being dramatic. It’s a sign that your chain could be stretched or worn out.
- Visual Wear: Look for rust or stiff links.
Tools You’ll Need
You don’t need a full toolbox, but having a few essential tools can make life easier. A chain cleaner, lubricant, and a basic repair kit should do the trick. I mean, it’s not rocket science, but it helps to have the right gear.
| Tool | Purpose |
|---|---|
| Chain Cleaner | To remove dirt and grime from your chain. |
| Lubricant | To keep your chain running smoothly. |
| Chain Checker | To measure chain wear and stretch. |
In conclusion, taking care of your bike chain is crucial for a smooth ride. It’s not rocket science, but it does require some attention. So, get out there and keep pedaling! Just remember, a little maintenance goes a long way. And who knows, you might even impress your friends with your bike knowledge. Not that it’s a competition or anything, but still!
Importance of Regular Maintenance
You might think, “Why should I bother?” Well, let me tell you, regular maintenance is like giving your bike a little love. It keeps your bike running smooth and helps avoid those costly repairs later. Plus, who doesn’t want a shiny chain? Seriously, it’s like the bling of the bike world!
Not really sure why this matters, but if you ignore your bike chain, it can lead to a whole lotta problems. And trust me, nobody wants to be stuck on the side of the road with a broken bike. So, let’s dive into why regular maintenance is super important.
- Prevents Major Issues: Just like you go to the doctor for a check-up, your bike needs some TLC too. A little maintenance can prevent major breakdowns. It’s like putting off a dentist appointment; you know it’s gonna hurt later!
- Enhances Performance: When your chain is clean and well-lubed, it runs smoother. It’s like when you finally get that coffee fix in the morning; you feel energized and ready to take on the world. Same goes for your bike!
- Extends Lifespan: Regular maintenance can extend the life of your bike chain. Think of it as investing in your ride. If you take care of it, it’ll take care of you. Simple as that!
Sometimes it’s hard to tell when your chain is in trouble. If it’s making weird noises or skipping gears, it’s probably time to take a closer look. A noisy chain is like a crying baby — it means something’s wrong! If you hear grinding or clicking, don’t ignore it. Seriously, fix it before it gets worse!
Now, let’s talk about some practical tips for maintaining your bike chain. You don’t need to be a pro mechanic to keep your ride in shape, but having the right tools is key. Here’s a quick list of what you’ll need:
| Tool | Purpose |
|---|---|
| Chain Cleaner | To remove dirt and grime |
| Lubricant | To keep the chain moving smoothly |
| Chain Checker Tool | To measure chain wear |
Cleaning your chain is super important, but it can be a messy job. Don’t wear your favorite shirt, trust me on this one. First off, you’ll wanna remove the chain from your bike. It sounds scary, but it’s not that hard. Just follow these steps, and you’ll be golden!
After cleaning, lubrication is key! A well-lubed chain runs smoother and lasts longer. But, don’t go overboard — too much lube is just as bad! When applying lube, make sure to do it sparingly. A little goes a long way, and nobody wants a greasy mess. Seriously, it’s like trying to clean up after a toddler.
In conclusion, taking care of your bike chain is crucial for a smooth ride. It’s not rocket science, but it does require some attention. So, get out there and keep pedaling! You’ll be glad you did, and your bike will thank you too!
Signs Your Chain Needs Attention
So, let’s talk about bike chains, shall we? Sometimes it’s a total mystery when your chain is in trouble. Like, one minute you’re cruising along, feeling like a pro, and the next you’re wondering if your bike is possessed. If your chain is making weird noises or skipping gears, it’s probably time to take a closer look. Seriously, don’t just ignore it!
- Weird Noises: A noisy chain is like that friend who just won’t stop talking about their cat. If you hear grinding or clicking, it’s a red flag! You might think, “Oh, it’s just a little noise,” but trust me, that little noise can turn into a big problem. Fix it before it gets worse!
- Skipping Gears: If your bike is skipping gears, it’s not just being dramatic. It’s like your chain is throwing a tantrum. This could mean your chain is stretched or worn out. Yikes, right? You don’t want to end up stranded in the middle of nowhere because your chain decided to quit on you.
Now, I know what you’re thinking, “How do I even know if my chain is in trouble?” Well, here are some practical insights to help you out:
| Signs of Trouble | What It Means | What to Do |
|---|---|---|
| Weird Noises | Chain could be dirty or damaged | Clean or replace the chain |
| Skipping Gears | Chain is stretched or worn | Check for wear and replace if necessary |
| Difficulty Shifting | Chain or derailleur issues | Inspect and adjust derailleur |
But here’s the kicker: sometimes, it’s not just about the chain. Maybe your derailleur is having a bad day too! If you notice any of these signs, don’t just shrug it off. I mean, who wants to deal with a bike that’s acting like a diva? Not me!
Also, let’s be real here, maintaining your bike chain isn’t rocket science, but it does require some attention. It’s like taking care of a pet — you gotta feed it, give it some love, and sometimes, just sometimes, you gotta take it to the vet (or in this case, the bike shop).
So, if you’re hearing those weird noises or if your bike is skipping gears, just take a moment to check it out. It might save you a lot of headaches later on. And who knows, you might even impress your friends with your newfound bike maintenance skills. Or at least, you won’t be the one walking your bike home!
In conclusion, keeping an eye (or ear) out for these signs can really extend the life of your ride. So, get out there, ride safe, and don’t let your chain be the drama queen of your biking adventures!
Noise Level Indicators
A noisy chain is like a crying baby — it means something’s wrong! Seriously, if you hear those weird grinding sounds or clicking noises, don’t just brush it off like it’s nothing. I mean, come on, it’s a warning sign! Ignoring it is like ignoring your friend when they say they’re fine, but you can see they’re clearly not. Fix it before it gets worse!
So, let’s break down what these noises could mean. It’s not rocket science, but it does require a bit of attention. Here’s a quick rundown:
- Grinding Noise: If your chain is grinding, it’s usually a sign that it’s dirty or maybe even worn out. Just like your favorite pair of jeans that you refuse to throw away, your chain can also wear down over time.
- Clicking Sound: This can indicate that your chain is misaligned or that your gears are not shifting properly. It’s like when you try to fit a square peg in a round hole — it just doesn’t work right!
- Skipping Gears: If your bike is skipping gears, it’s not just being dramatic. It’s a sign that your chain could be stretched or worn out. Yikes, right? It’s like when you’re trying to eat spaghetti but the fork just keeps slipping — super frustrating!
Now, I know what you might be thinking: “Why should I care about these noises?” Well, let me tell you, ignoring them can lead to bigger problems down the road. It’s like ignoring a small leak in your roof; eventually, it’s gonna rain on your parade!
To help you out, I’ve put together a little table that summarizes the common noises and their potential causes:
| Noise Type | Possible Cause | Recommended Action |
|---|---|---|
| Grinding | Dirty or worn chain | Clean or replace the chain |
| Clicking | Misaligned chain or gears | Adjust the gears |
| Skipping | Stretched or worn chain | Replace the chain |
It’s super important to listen to your bike. I mean, it’s not just a mode of transport; it’s like your trusty steed! You wouldn’t ignore a horse that’s whinnying, right? So why would you do that to your bike? Maybe it’s just me, but I feel like paying attention to these signs makes for a much smoother ride.
And if you’re unsure about what to do, don’t hesitate to ask for help. Whether it’s a friend who’s into biking or a local bike shop, getting a second opinion can save you a lot of hassle and money. Trust me, you don’t want to be the person who ends up stranded with a broken chain!
In conclusion, keeping an ear out for those noises is crucial. A little attention goes a long way in maintaining your bike’s health. So, next time you hear that grinding or clicking, remember — it’s time to take action. Happy riding!
Skipping Gears
: If your bike is skipping gears, it’s not just being dramatic. It’s a sign that your chain could be stretched or worn out. Yikes, right? But hey, don’t freak out just yet! This is a common issue and it can be fixed. So, let’s dive into the nitty-gritty of what could be causing this and how you can keep your ride smooth.
- Chain Wear: Over time, chains naturally wear down. It’s like those old sneakers you just can’t let go of — they’ve got character, but they’re not really doing their job anymore. If your chain is stretched, it can lead to skipping gears, which is super annoying.
- Derailleur Issues: Sometimes, it’s not the chain but the derailleur that’s out of whack. If it’s misaligned, it can cause the chain to skip. It’s like trying to fit a square peg in a round hole — it just ain’t gonna work.
- Dirty Components: A dirty chain or derailleur can also lead to skipping. Think of it like trying to eat soup with a fork. Not the best idea, right? Keeping everything clean is key to a smooth ride.
Signs Your Chain Needs Attention: Now, how do you know if your chain is the culprit? Well, there are some telltale signs. If you’re hearing weird noises or feeling that annoying jerk when you’re pedaling, it’s time to take a closer look. And if your bike is skipping gears, it’s basically waving a red flag at you.
Example of Skipping Gears Symptoms:- Unusual noise while pedaling- Inconsistent shifting- Jerkiness in pedaling
Checking Your Chain: So, how do you check for wear? You can use a chain checker tool, or if you’re feeling adventurous, a ruler will do. Just measure how much it’s stretched. If it’s beyond the recommended length, it’s time for a replacement. Not really sure why this matters, but a worn chain can lead to more expensive repairs down the line. It’s like ignoring a small leak in your roof until your living room is flooded.
| Chain Wear Indicators | Action Needed |
|---|---|
| Less than 0.5% stretch | No action needed |
| 0.5% to 1% stretch | Monitor closely |
| More than 1% stretch | Replace chain |
Preventative Measures: To avoid skipping gears in the future, regular maintenance is key. Clean your chain often, lubricate it properly, and check for wear regularly. Maybe it’s just me, but I feel like a little maintenance goes a long way. It’s like brushing your teeth — you don’t want to wait until you have a cavity to start caring.
Conclusion: So, if your bike is skipping gears, don’t ignore it. It’s your bike’s way of saying, “Hey, pay attention to me!” With a little TLC, you can keep your ride smooth and enjoyable. Remember, a well-maintained bike is a happy bike. And who doesn’t want a happy bike?
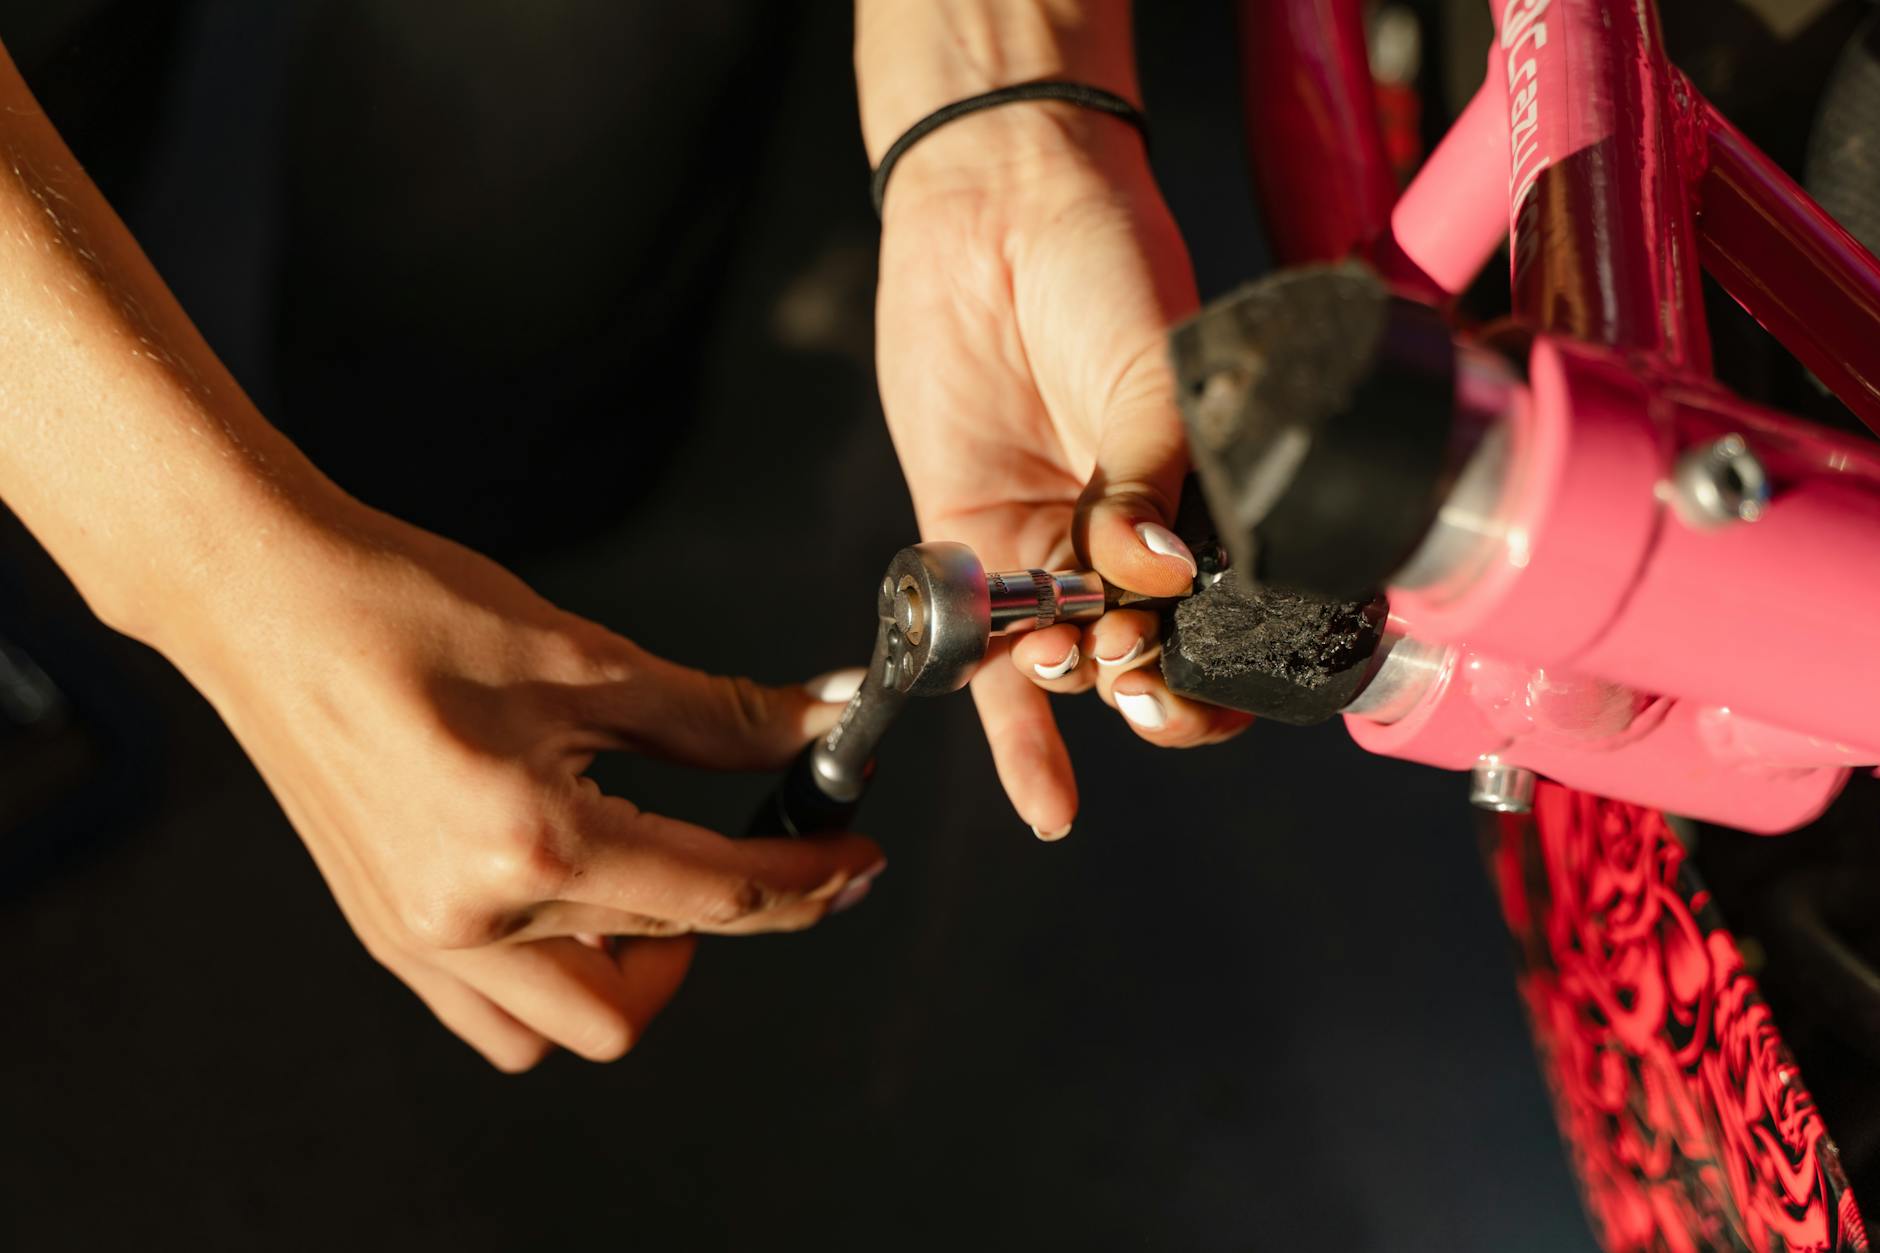
Tools You’ll Need
You don’t need a full toolbox, but having a few essential tools can make life easier. Seriously, I mean, who wants to lug around a giant toolbox when you can just grab a few key items? Here’s a quick rundown of what you should consider keeping in your bike maintenance kit:
- Chain Cleaner: This little gadget is a lifesaver. It’s like a mini car wash for your bike chain. You just attach it, pour in some degreaser, and let it do its thing. Not really sure why this matters, but a clean chain is a happy chain!
- Lubricant: After you’ve cleaned your chain, you gotta lube it up. Think of it like lotion for your bike. A well-lubed chain runs smoother and lasts longer. But don’t go crazy with it; too much lube is like putting on too much cologne — just no.
- Basic Repair Kit: You don’t need every tool under the sun, but a basic repair kit is crucial. It should include a tire lever, a multi-tool, and a patch kit. If you ride often, you’ll thank yourself later when you don’t have to walk home with a flat tire!
Why These Tools Matter
Okay, so maybe you’re thinking, “Do I really need all this?” Well, let me tell you, having the right tools can save you time and headaches. Imagine this: you’re out on a ride, and your chain starts making weird noises. If you’ve got a chain cleaner and some lube handy, you can quickly sort it out instead of waiting for a friend to come rescue you. Not that I’m speaking from experience or anything…
Quick Reference Table
| Tool | Purpose |
|---|---|
| Chain Cleaner | Removes dirt and grime from the chain |
| Lubricant | Keeps the chain running smoothly |
| Basic Repair Kit | Fixes minor issues on the go |
Final Thoughts
So, there you have it! A few essential tools can make a huge difference in your biking experience. Maybe it’s just me, but I feel like being prepared is half the battle. You don’t want to be that person stuck on the side of the road, frantically googling “how to fix a bike chain.” Trust me, it’s not a good look.
In conclusion, investing in a chain cleaner, lubricant, and a basic repair kit is totally worth it. It’s not rocket science, but it does require some attention. So, get your tools together and keep that bike running smooth. Happy riding!
Cleaning Your Bike Chain
Cleaning your bike chain is super important, but let’s be real, it can be a messy job. Don’t wear your favorite shirt, trust me on this one. I mean, who wants to ruin a perfectly good shirt just because of some greasy chain gunk? Not me! But hey, if you want your bike to last, you gotta get your hands dirty. So, let’s dive into the nitty-gritty of how to clean that chain like a pro.
- Gather Your Supplies: Before you start, make sure you have all the necessary tools. You’ll need:
- Chain cleaner
- Degreaser
- Rags or old cloths
- Brush (an old toothbrush works wonders)
- Lubricant (more on that later)
Once you have everything ready, it’s time to roll up those sleeves! First off, you’ll wanna remove the chain from your bike. It sounds scary, but it’s not that hard. Just follow these steps, and you’ll be golden! If you’re not sure how to do it, maybe check out a YouTube video. Seriously, those guys make it look easy.
| Step | Action |
|---|---|
| 1 | Shift your bike into the smallest gear |
| 2 | Use a chain tool to break the chain |
| 3 | Remove the chain from the bike |
Now that the chain is off, it’s time to get cleaning! A chain cleaner can save you time and effort. Just attach it, add some degreaser, and let it do its magic. It’s like a spa day for your chain! But, be careful, some cleaners can be harsh and might not be good for the environment. So, maybe look for eco-friendly options? Just a thought!
Cleaning Process:
1. Place the chain in the cleaner.2. Add degreaser and let it soak for a few minutes.3. Use the brush to scrub away the grime.4. Rinse it off with water.5. Dry it thoroughly with a rag.
After you’ve cleaned the chain, lubrication is key! A well-lubed chain runs smoother and lasts longer. But, don’t go overboard — too much lube is just as bad! It’s like putting too much salt on your fries. Yuck! So, when applying lube, make sure to do it sparingly. A little goes a long way, and nobody wants a greasy mess. Seriously, it’s like trying to clean up after a toddler.
Not all lubricants are created equal. You’ll want to pick one that fits your riding conditions. Wet or dry lube? That’s the million-dollar question! If you ride in wet conditions, you might want a wet lube. If it’s dry and dusty, go for dry lube. It’s all about finding what works best for you.
So, how often should you clean your chain? Well, it depends on how much you ride. If you’re like me and ride every chance you get, maybe clean it every couple of weeks. But if you’re more of a weekend warrior, you might get away with once a month. Just keep an eye on it, and you’ll know when it needs some TLC.
In conclusion, taking care of your bike chain is crucial for a smooth ride. It’s not rocket science, but it does require some attention. So, get out there and keep pedaling! And remember, a clean chain is a happy chain!
Step-by-Step Cleaning Process
Alright, so you’re ready to tackle the cleaning of your bike chain? First off, you’ll wanna remove the chain from your bike. It sounds scary, but it’s not that hard. Just follow these steps, and you’ll be golden! Seriously, it’s like riding a bike — oh wait, you already know how to do that!
- Gather Your Tools: You’ll need a few things: a chain tool, some degreaser, a rag, and maybe a cup of coffee to keep you motivated. Trust me, this is essential — you don’t want to be running around looking for stuff mid-clean.
- Remove the Chain: Using your chain tool, carefully break the chain. It’s like a puzzle piece, and you gotta find the right spot to pop it off. Not gonna lie, it can be a bit tricky, but you got this!
- Soak It: Once the chain is off, soak it in a bucket of degreaser for about 10-15 minutes. This part is crucial, like letting a steak marinate. You wouldn’t want to eat it right away, right?
Now, while the chain is soaking, you can take a moment to reflect on life. Maybe think about why you’re cleaning a chain instead of enjoying a sunny day at the park. But I digress!
After soaking, it’s time to scrub. Grab your rag and start wiping down the chain. You’re gonna want to get in all those nooks and crannies. It’s like cleaning your room — you can’t just shove everything under the bed and call it a day. No, no, no!
| Step | Description |
|---|---|
| 1 | Gather your tools and coffee. |
| 2 | Remove the chain using a chain tool. |
| 3 | Soak the chain in degreaser. |
| 4 | Scrub the chain clean with a rag. |
Once you’ve scrubbed it to your heart’s content, rinse off the chain with some water. Make sure to get all that degreaser off, or you’ll end up with a sticky mess. Not really sure why this matters, but it’s probably a good idea to follow through with it.
Now, let’s dry it off. You can use a clean rag or just let it air dry. But, here’s a pro tip: don’t leave it out in the sun too long. You don’t want your chain to get sunburned or something. Maybe it’s just me, but I feel like that could happen!
Finally, once the chain is dry, it’s time to lubricate. A well-lubed chain runs smoother, lasts longer, and makes you feel like a biking pro. Just a little dab will do ya — you don’t wanna drown it in lube. That’s like trying to swim in a kiddie pool. Not fun!
And there you have it! Your bike chain is clean, fresh, and ready to hit the road again. So, get out there and ride like the wind — or at least like a gentle breeze. Just remember, a clean chain is a happy chain!
Using a Chain Cleaner
So, let’s talk about this magical thing called a chain cleaner. I mean, who knew that a little gadget could make such a big difference? Not really sure why this matters, but if you want your bike chain to stay in tip-top shape, then a chain cleaner is definitely something you should consider. Seriously, it’s like a spa day for your chain! You just attach it, add some degreaser, and let it do its magic. It’s almost too easy, right?
Now, before you dive in, let’s break down the step-by-step process of using a chain cleaner:
- Step 1: First, you gotta gather your supplies. You’ll need the chain cleaner, some degreaser, and maybe a rag or two. Trust me, you’ll want to have those handy!
- Step 2: Next, attach the chain cleaner to your chain. This part can be a bit tricky, especially if you’re not used to it. Just make sure it’s on there nice and snug.
- Step 3: Pour some degreaser into the cleaner. Don’t skimp here; a good degreaser makes all the difference. I mean, who wants a dirty chain?
- Step 4: Now, pedal backward and let the chain cleaner do its thing. You’ll see all that grime and gunk just disappear. It’s oddly satisfying, like watching a magic trick unfold!
- Step 5: Finally, wipe down your chain with a rag to remove any excess degreaser. You don’t want your chain to be slippery, unless you’re into that sort of thing.
But here’s the catch: not all chain cleaners are created equal. Some are like the fancy spa treatments for your chain, while others are more like a quick rinse at the car wash. So, do your research! Maybe it’s just me, but I feel like investing in a good chain cleaner is worth it in the long run. You wouldn’t want to skimp on your bike’s health, right?
| Type of Chain Cleaner | Pros | Cons |
|---|---|---|
| Manual Chain Cleaner | Effective cleaning, affordable | Requires effort, can be messy |
| Ultrasonic Cleaner | Deep cleaning, thorough | Expensive, bulky |
| Automatic Chain Cleaner | Convenient, less effort | Can be pricey, not always effective |
In conclusion, using a chain cleaner is like giving your bike chain a much-needed pampering session. It saves you time and effort, and honestly, who doesn’t want that? Just remember, a clean chain means a smoother ride, and less chance of those annoying breakdowns. So, go ahead and treat your bike chain to a little TLC. You won’t regret it!
Lubricating Your Chain
So, let’s talk about lubricating your bike chain. After you’ve gone through the hassle of cleaning it, which, let’s be honest, is a bit of a chore, you gotta make sure you lube it up right. A well-lubed chain runs smoother and lasts longer, but here’s the kicker — don’t go overboard! Too much lube is just as bad, and trust me, it can turn your bike into a slippery mess.
Now, you might be wondering, what’s the deal with lubrication? Well, it’s like giving your bike chain a nice little spa day. It keeps everything moving smoothly and helps prevent rust and wear. But, like I said, moderation is key. Too much lube can attract dirt and grime, which is basically the opposite of what you want. It’s like trying to clean your room and then throwing a party — just doesn’t make sense!
- Choosing the Right Lubricant: Not all lubricants are created equal. You’ve got your wet lubes and your dry lubes. Wet lubes are great for those rainy days, while dry lubes are perfect for dusty trails. It’s like choosing between a raincoat and sunscreen — depends on the weather!
- Application Tips: When applying lube, make sure to do it sparingly. A little goes a long way, and nobody wants a greasy mess. Seriously, it’s like trying to clean up after a toddler. Just a few drops on each link, and you’re golden!
Here’s a quick table to help you decide what lube to use based on your riding conditions:
| Condition | Recommended Lube |
|---|---|
| Wet and muddy | Wet lubricant |
| Dry and dusty | Dry lubricant |
| Mixed conditions | All-purpose lubricant |
Now, I know what you’re thinking: “This is all great, but how often should I be lubing my chain?” Well, it really depends on how much you ride. If you’re out there grinding every day, you might want to lube it every week. If you’re more of a casual rider, maybe once a month will do. Just remember, if your chain starts to sound like it’s crying for help, it’s time to give it some love!
Also, don’t forget to wipe off any excess lube after you’ve applied it. It’s super important. Leaving it on can lead to a buildup of gunk, which is the last thing you want. It’s like eating a greasy burger and then wondering why your stomach hurts — just not a good idea!
In conclusion, is an essential part of bike maintenance. It’s not rocket science, but it does require a bit of attention. So, don’t just slap on some lube and call it a day. Take the time to do it right, and your bike will thank you with smoother rides and a longer lifespan. Now, get out there and keep pedaling!
Choosing the Right Lubricant
So, let’s dive into the world of bike chain lubricants, shall we? Not all lubricants are created equal. You’ll want to pick one that fits your riding conditions. Wet or dry lube? That’s the million-dollar question! It’s like choosing between coffee or tea in the morning – both have their perks, but you gotta know what you’re in the mood for.
- Wet Lubricants: These are like the superheroes of the lube world when it comes to wet conditions. They stick around longer in the rain and mud, kinda like that one friend who never leaves your side at a party. But, they can attract dirt and grime, so it’s a double-edged sword. You gotta clean your chain more often, which is a bummer.
- Dry Lubricants: On the flip side, dry lubes are like the chill friends who prefer to hang out in the sun. They’re great for dry and dusty conditions, allowing your chain to run smoothly without attracting too much dirt. But, if it rains, well, you might as well be riding with no lube at all. Not really sure why this matters, but it does!
When it comes to choosing the right lubricant, you might feel a bit overwhelmed. I mean, how many options are there? It’s like walking into a candy store and just staring at all the choices. To make things easier, here’s a quick comparison table:
| Type | Best For | Pros | Cons |
|---|---|---|---|
| Wet Lubricant | Rainy or muddy conditions | Long-lasting, good for harsh weather | Attracts dirt, requires more cleaning |
| Dry Lubricant | Dry and dusty conditions | Keeps chain clean, easy application | Wears off quickly in wet weather |
Now, let’s talk about application tips. When applying lube, make sure to do it sparingly. A little goes a long way, and nobody wants a greasy mess. Seriously, it’s like trying to clean up after a toddler – it’s messy and you just wanna cry. Here’s a simple step-by-step guide:
1. Clean your chain first. 2. Apply a drop of lube to each link while rotating the pedals backward. 3. Wipe off excess lube with a cloth. 4. Let it sit for a few minutes, then you're good to go!
And hey, if you’re still unsure about which lube to choose, maybe it’s just me, but I like to read reviews or ask fellow cyclists. It’s like asking for recommendations on Netflix – you want to make sure you’re not wasting your time on a dud.
In conclusion, picking the right lubricant for your bike chain is crucial. It can make or break your ride. So, whether you go wet or dry, just remember to keep it clean and apply it right. Your bike will thank you, and you’ll enjoy a smoother ride. Plus, nothing beats the feeling of gliding down the road with a well-maintained chain!
Application Tips
for Lubricating Your Bike Chain
So, you’ve cleaned your bike chain, and now it’s time for the fun part: applying lubricant. But hold your horses! You gotta be careful here. Applying lube is kinda like seasoning your food; too much and you ruin the whole dish. Not really sure why this matters, but trust me, a little goes a long way.
- Start Small: When you’re ready to apply the lube, just use a few drops. Seriously, nobody wants a greasy mess all over their bike. It’s like trying to clean up after a toddler, and we all know how that goes!
- Focus on the Links: Make sure to apply the lube directly on the chain links. You want it to get into the nooks and crannies, not just sit on top like a lazy cat.
- Wipe Off Excess: After you’ve applied the lube, take a clean rag and wipe off any excess. This step is crucial! Otherwise, you’ll attract dirt and grime, which is basically the enemy of your bike chain.
Now, maybe it’s just me, but I feel like there’s an art to applying lube. You can’t just slap it on and call it a day. You gotta be all zen about it. Think of it as a mini-meditation session. Focus, breathe, and don’t rush!
Also, don’t forget about the type of lubricant you’re using. Choosing the Right Lubricant is super important. You’ve got wet lubes, dry lubes, and everything in between. Wet lubes are great for rainy days, while dry lubes are better for dusty trails. Pick your poison wisely!
| Type of Lube | Best For | Pros | Cons |
|---|---|---|---|
| Wet Lube | Rainy Conditions | Lasts Longer | Attracts Dirt |
| Dry Lube | Dry Conditions | Stays Clean | Wears Off Quickly |
Now, let’s talk about frequency. How often should you be lubing your chain? Well, it kinda depends on how much you ride. If you’re out there every day, you might wanna lube it once a week. But if you’re more of a casual rider, maybe every couple of weeks is fine. Just keep an eye on it! A well-lubed chain is like a happy puppy; it runs smoother and lasts longer.
And here’s a little pro tip: after you lube your chain, give it a little spin. This helps distribute the lube evenly. It’s like giving your bike a nice little massage. Seriously, your bike will thank you for it!
In conclusion, applying lube to your bike chain isn’t rocket science, but it does require a bit of finesse. So, take your time, don’t rush it, and remember that less is more. Happy riding!
Checking Chain Wear
Over time, bike chains, like anything else that gets used a lot, start to stretch and wear out. It’s kinda like that old pair of jeans you refuse to throw away — they still fit, but they’re definitely not in their prime anymore. You gotta check for that wear regularly, or you might end up in a sticky situation. It’s like checking your bank account after a shopping spree — not always pretty!
- Why Check Chain Wear? — If you ignore it, you could end up with a broken chain while riding. And trust me, that’s not a fun way to spend your Saturday.
- How Often to Check? — Generally, every few hundred miles or after a muddy ride. But hey, if you’re like me and forget things easily, just set a reminder on your phone!
So, what’s the deal with checking chain wear? Well, it’s not rocket science, but it does require a little know-how. You can use a chain checker tool or, if you’re feeling adventurous, a ruler. Just measure how much it’s stretched and decide if it’s time for a replacement. But, *not gonna lie*, it can be a bit confusing if you’re new to this whole bike maintenance thing.
| Chain Wear Measurement | Action Required |
|---|---|
| 0-0.5% Stretch | No action needed |
| 0.5-1% Stretch | Monitor closely |
| 1-1.5% Stretch | Consider replacement |
| Over 1.5% Stretch | Replace immediately! |
Now, let’s get real for a second. If your chain is too stretched or worn, it’s time to replace it. Don’t wait until it snaps on a ride — that’s just asking for trouble! I mean, who wants to be that person stuck on the side of the road, right? Not me, thank you very much!
Also, if you’re not really sure how to replace the chain, just watch a couple of YouTube videos. Seriously, there’s a tutorial for everything these days! Maybe it’s just me, but I feel like I learn better when I can see someone else messing up before I try it myself.
In conclusion, taking care of your bike chain is crucial for a smooth ride. It’s not rocket science, but it does require some attention. So, get out there and keep pedaling! And remember, a little bit of maintenance can go a long way. Your bike will thank you, and you’ll avoid those awkward moments when you realize your chain is toast.
Measuring Chain Stretch
When it comes to bike maintenance, one of the most important aspects is keeping an eye on your chain. Not really sure why this matters, but a well-maintained chain can totally make or break your ride. So, let’s dive into the nitty-gritty of measuring chain stretch. You might be thinking, “Do I really need to do this?” Well, yes! You don’t wanna be that person stuck on the side of the road, right?
First off, you can use a chain checker tool, which is specifically designed for this purpose. It’s like a magic wand for your bike chain. You just pop it on there and it tells you how much wear and tear your chain has been through. But if you’re feeling adventurous and don’t have one lying around, you can totally use a ruler. Yeah, I know it sounds a bit old-school, but hey, sometimes the classics work best!
Steps to Measure Chain Stretch
- Step 1: Clean your chain first. I mean, you wouldn’t want to measure a dirty chain, right? It’s like weighing yourself after a buffet — not accurate at all!
- Step 2: Get your ruler and measure from one pin to another. You wanna measure 12 links, which is usually about 12 inches. If you see that the distance is more than 12 inches, then Houston, we have a problem!
- Step 3: Compare your measurement to the standard length. If it’s stretched beyond 12.1 inches, it’s probably time for a replacement. Don’t wait until it snaps during a ride — talk about embarrassing!
Now, some people might wonder, “Why bother measuring? Isn’t it just going to stretch anyway?” And honestly, maybe it’s just me, but keeping track of your chain’s health can save you a ton of money in the long run. Replacing a chain is way cheaper than fixing a whole drivetrain. It’s like choosing between a small coffee and a full-blown latte — one is just smarter for your wallet!
Signs Your Chain is Worn Out
Besides measuring, there are other signs to look out for. If your bike starts making weird noises, or if it’s skipping gears like it’s trying to avoid a conversation, then it’s time to take action. A noisy chain is like a crying baby — it needs attention!
| Signs of Wear | Action Needed |
|---|---|
| Chain skips gears | Check for stretch and replace if necessary |
| Noisy operation | Lubricate or consider replacing |
| Visible rust or dirt | Clean and lubricate |
In conclusion, measuring chain stretch is not just some boring chore; it’s an essential part of bike maintenance that can extend the life of your ride. So, grab that ruler or chain checker tool and get to work! Trust me, your future self will thank you. And who knows, maybe you’ll even impress your friends with your newfound bike maintenance skills. Just don’t forget to keep it clean and lubricated. Happy riding!
When to Replace Your Chain
So, let’s get real for a second. If you’re riding your bike and your chain starts to feel like it’s got a mind of its own, it’s probably time to replace it. Not really sure why this matters, but it totally does! A worn-out chain can lead to a whole bunch of issues, and trust me, you don’t want to be that person who’s stranded on the side of the road, waiting for a miracle.
- Understanding Chain Wear: Chains don’t last forever, right? They stretch and wear down over time. If you’re riding a lot, you might notice it happening faster than you think.
- Signs of a Worn Chain: If your bike starts making weird noises or you feel like you’re pedaling through mud, it might be time to check that chain. Sometimes it’s just a little dirt, but other times, it’s like your chain is begging for a break!
Here’s a little checklist to help you out:
| Signs Your Chain Needs Replacing | What to Look For |
|---|---|
| 1. Excessive Stretch | Use a chain checker tool to measure stretch. If it’s over 0.5% stretched, it’s time to replace! |
| 2. Skipping Gears | If your bike skips gears when you’re riding, it’s not just being dramatic. Check that chain! |
| 3. Noise | Grinding or clicking noises? Not a good sign! Fix it before it gets worse. |
Now, you might be thinking, “What if I just ignore it?” Well, let me tell you, that’s like ignoring a toothache. Eventually, it’s gonna hurt, and you’ll regret not taking action sooner. Plus, a broken chain can lead to some serious accidents. You don’t want to end up in the hospital because you thought you could tough it out!
But, hey, maybe it’s just me, but I feel like a lot of people overlook this stuff. They think, “Oh, I’ll deal with it later.” But later turns into never, and then boom! You’re stuck.
How to Check Your Chain
Checking your chain isn’t rocket science, but it does require a little effort. Here’s a simple way to do it:
1. Get a chain checker tool.2. Place it on your chain.3. If it fits snugly, it’s time for a replacement.
Honestly, it’s that easy. And if you don’t have a chain checker, you can always use a ruler. Just measure how much it’s stretched. If it’s over 12 inches, you might be in trouble!
In conclusion, don’t be that person who ignores their bike chain. Pay attention, check for wear, and replace it when necessary. It’s not just about keeping your bike running smoothly; it’s about your safety too. So, get out there, check that chain, and keep riding without worries!
Conclusion: Keep Riding Smooth
In wrapping this up, taking care of your bike chain is not just some boring chore; it’s actually a vital part of keeping your ride smooth and enjoyable. I mean, who wants to deal with a squeaky chain or worse, a snapped one in the middle of nowhere? Not me! So let’s dive into why this is important and how you can make it happen.
First off, it’s really not rocket science, but it does require a bit of attention. You don’t have to be a bike mechanic or anything, just a little know-how goes a long way. And hey, if you’re like me, you probably love the feeling of gliding down the road without any hiccups. Regular maintenance can actually save you a ton of money in the long run. Think about it — if you keep your chain in good shape, you’re less likely to face costly repairs down the line.
- Check for wear: A stretched chain can lead to all sorts of issues, like slipping gears or even damage to your bike’s drivetrain. So, keep an eye on it!
- Listen for noises: If your chain is making weird sounds, it’s like a dog barking at the mailman — something’s up!
- Clean and lube: A clean chain is a happy chain! Just remember, too much lube is like putting on too much cologne — it’s overwhelming!
Now, let’s talk about cleaning your bike chain. It’s super important, but let’s be real, it can get messy. You might wanna wear some old clothes, trust me on this one! Here’s a quick rundown on how to do it:
1. Remove the chain from your bike. 2. Use a chain cleaner tool with degreaser.3. Rinse and dry it off.4. Apply lubricant sparingly.
And don’t forget to lubricate your chain after cleaning it. It’s like giving your bike a nice little spa day. Just don’t go overboard; nobody wants a greasy mess all over their bike. Seriously, it’s like trying to clean up after a toddler with spaghetti.
But hey, if you’re not sure how often to do this, maybe start with every month or so? It really depends on how much you ride. If you’re out there every day, you might need to do it more often. But if you’re like me and only ride on weekends, then once a month should do the trick.
So, as we wrap this up, I just wanna say that taking care of your bike chain isn’t just about keeping it shiny and new; it’s about ensuring a smooth ride every time you hop on. Don’t wait until something breaks! Take a few minutes to check your chain and keep it in good shape. Trust me, you’ll thank yourself later when you’re cruising down the road without any issues.
In conclusion, maintaining your bike chain is crucial for a smooth ride. It might seem like a hassle, but it’s really just a few simple steps that can make a world of difference. So, get out there, enjoy the ride, and keep pedaling!


